How Do I Create a Virtual Machine: A Practical Guide

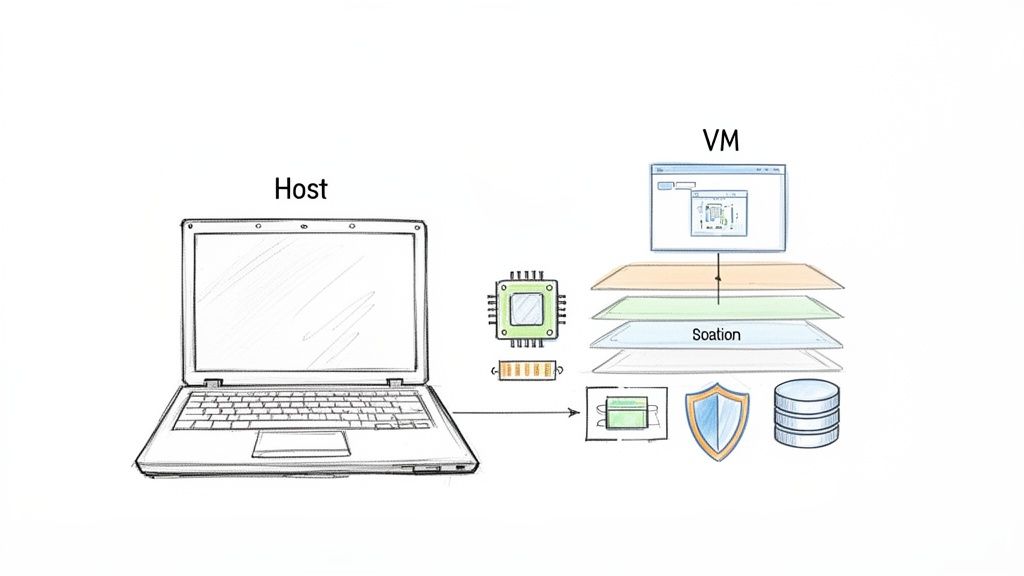
Creating a virtual machine (VM) means using a nifty piece of software called a hypervisor to carve out a totally isolated, digital version of a computer that lives on a physical host machine. It's like having a computer inside your computer. This setup gives you incredible flexibility for development, testing, and even consolidating servers.
Ready to cut your cloud costs without wrestling with complex scripts? Server Scheduler helps teams reduce AWS bills by up to 70% by automating when your development and staging VMs are on or off.
Contents
- What Are Virtual Machines and Why Use Them
- Setting Up Your AWS Environment for a Secure VM Launch
- A Guided Walkthrough of Launching Your First EC2 Instance
- Connecting to Your New Virtual Machine and Running First Commands
- How to Manage VM Costs and Avoid Surprise Bills
- Common Questions About Creating a Virtual Machine
Ready to Slash Your AWS Costs?
Stop paying for idle resources. Server Scheduler automatically turns off your non-production servers when you're not using them.
What Are Virtual Machines and Why Use Them
Before we jump into the "how," let's quickly cover the "why." A virtual machine is essentially a software-based computer. It borrows resources—CPU, memory, storage—from its host machine but operates as a completely separate system. This whole concept, known as virtualization, is the bedrock of modern IT and cloud computing. At its heart, a VM is a sandboxed environment. That isolation is its superpower. For developers, it means you can build and test an app on a perfectly clean slate without messing with the software on your main laptop. You can spin up a Linux VM on your Windows machine or test an app on an old OS without needing a separate computer for every scenario.
Every VM has a few key parts working together. The most important is the hypervisor—the software that actually creates and runs the virtual machines. They come in two main flavors: Type 1 (Bare Metal), which runs directly on the host's hardware like VMware ESXi or Microsoft Hyper-V, and Type 2 (Hosted), which runs on top of a regular operating system, like Oracle VirtualBox. In this guide, we'll focus on creating a VM on AWS, which uses a highly customized Type 1 hypervisor.
A VM even lets you go back in time with snapshots. You can roll the entire virtual computer back to a state before it was hit with malware. This means that even if your VM gets infected, it's not a big deal—just restore the snapshot and you're good to go.
For businesses, the perks go way beyond a simple sandbox. Virtualization is a huge strategic win, mostly because it drives efficiency and makes you more agile. By packing multiple virtual servers onto a single physical box, companies can slash their hardware, power, and cooling costs. This consolidation also makes disaster recovery a breeze. Since VMs are just files, you can back them up and move them to different hardware in a snap if something fails, keeping downtime to a minimum.
| Use Case Category | Specific Examples | Core Benefit |
|---|---|---|
| Development & Testing | Isolated environments for projects, testing on various OSs (Linux, Windows), simulating networks. | Isolation & Repeatability |
| Server Consolidation | Running multiple app servers (web, database, mail) on one physical machine. | Cost & Energy Savings |
| Legacy Application Support | Running old software that needs an older OS on modern, secure hardware. | Compatibility & Security |
| Disaster Recovery | Replicating VMs to a second site for quick failover if there's an outage. | Business Continuity |
The move to VMs is only picking up speed as companies look for more efficiency and cost savings. The global VM market hit USD 11.11 billion in 2024 and is expected to explode to USD 43.81 billion by 2034. This growth shows just how much DevOps and FinOps teams rely on VMs—whether on AWS EC2 or local hypervisors—to test code and run staging environments. For small and mid-sized businesses, which often have sprawling non-production AWS setups, VMs are a lifeline, making up over 73% of the market share in 2024 because they're cheap and scalable. You can dig into more data on these trends in this detailed virtual machine market report.
Setting Up Your AWS Environment for a Secure VM Launch
Before you can even think about launching a virtual machine in AWS, you have to lay the groundwork. A successful launch isn't just about clicking "Launch Instance" in the console; it's about preparing your cloud environment to be secure, scalable, and cost-effective right from the start. Skipping these foundational steps is like building a house without a proper foundation—it might look fine at first, but it will cause serious problems down the road. This is your pre-flight checklist. We'll start by picking the right AWS Region, then carve out your private network space, and lock down who can do what.
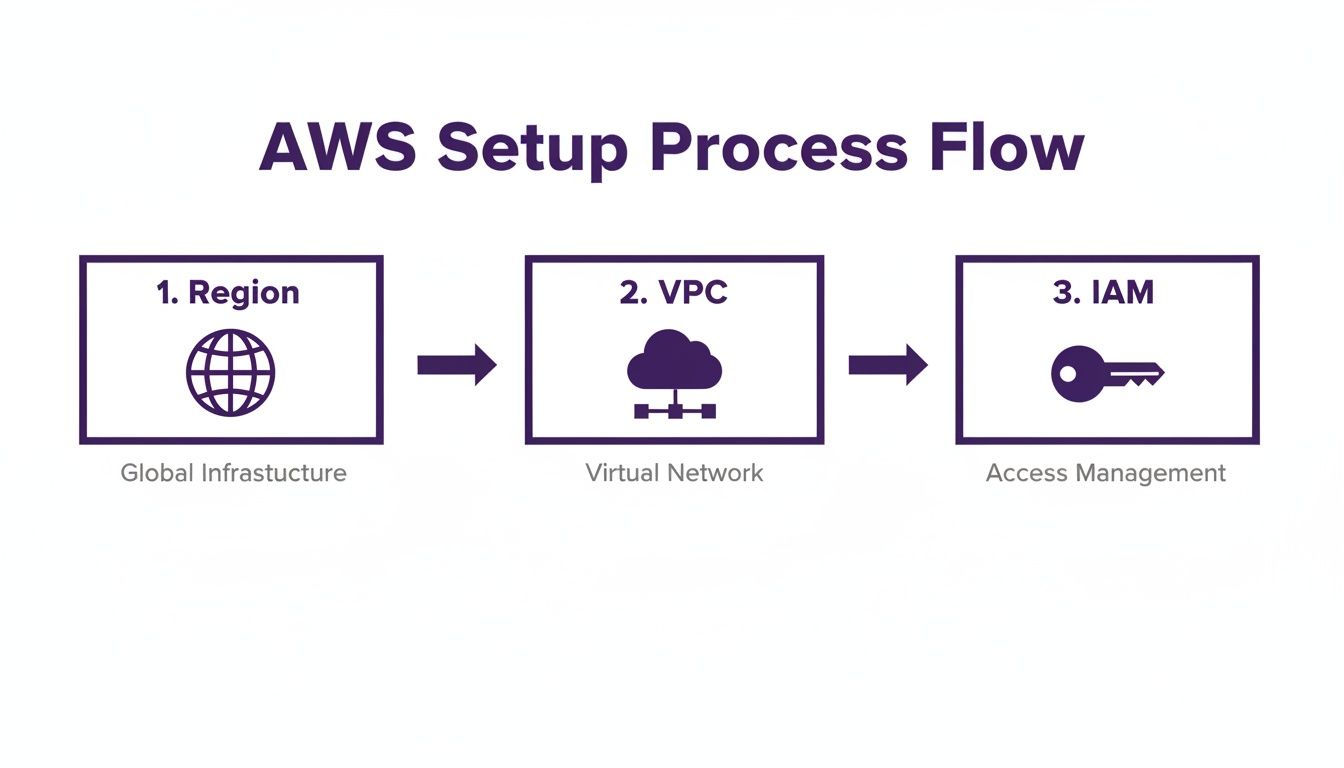
Your first big decision is selecting an AWS Region, a physical location where AWS clusters data centers. Picking one close to your users is key to minimizing latency. But latency isn't the whole story. Pricing for AWS services, including EC2 instances, varies from one region to another. For example, running a VM in us-east-1 (N. Virginia) might be cheaper than the same one in ap-northeast-1 (Tokyo). Always check the pricing for your target instance type across a few viable regions before you commit. For a deeper dive into the broader implications of moving to the cloud, it's worth exploring the latest trends.
Next up, you’ll need a Virtual Private Cloud (VPC). A VPC is your own logically isolated section of the AWS cloud. It acts as a virtual network that you control completely. For any real-world application, you’ll want to create a custom VPC. This gives you total control over your network architecture, letting you set up public-facing subnets for web servers while keeping sensitive resources like databases tucked away in private subnets. This single step dramatically improves your security posture. As you build out these environments, keeping accurate time becomes crucial. You can learn more about managing server date and time stamps to ensure your logs and processes are perfectly synchronized.
Finally, managing permissions with Identity and Access Management (IAM) is the most critical setup step. It's a dangerous mistake to use your AWS root account for day-to-day work. Instead, create an IAM user or role with limited permissions, following the principle of least privilege. To create a VM, you just need permissions to interact with EC2. By creating a dedicated IAM user, you get a clear audit trail and drastically shrink your attack surface.
Pro Tip: Never, ever embed access keys directly in your code or save them on an EC2 instance. Use IAM Roles instead. An IAM Role can be attached to an EC2 instance, giving it temporary permissions to access other AWS services without you having to manage long-term credentials.
A Guided Walkthrough of Launching Your First EC2 Instance
Now that you've got your AWS environment locked down and configured, it's time for the fun part: bringing your virtual machine to life. I'll walk you through the AWS EC2 launch wizard, but more importantly, I'll explain the real-world impact of each choice you make. From picking an operating system to setting up your virtual firewall, every decision here matters. Let's build a secure and functional VM from the ground up.
Your very first decision is choosing an Amazon Machine Image (AMI). Think of an AMI as a blueprint or a template for your server, containing the operating system and any other software needed to get your instance up and running. Two of the most common choices are Amazon Linux and Ubuntu. Amazon Linux is fine-tuned for the EC2 environment and plays nicely with other AWS services. Ubuntu is a rock-solid, general-purpose Linux distro with a huge community, making it a fantastic choice for almost any application.
With your AMI selected, you now need to choose an Instance Type. This is where you pick the hardware for your VM: how many virtual CPUs (vCPUs), how much memory (RAM), and its networking muscle. The T-family (like t3.micro) are burstable instances perfect for development or low-traffic sites. For apps needing consistent horsepower, look at the C-family (compute-heavy) or R-family (memory-intensive). Picking the right size is a balancing act between performance and cost. My advice? Start small and scale up if you need to. This practice, known as "right-sizing," can save you a fortune.
Next is storage and networking. Your EC2 instance gets a root Elastic Block Store (EBS) volume. For most workloads, General Purpose SSD (gp3) volumes offer a fantastic blend of price and performance. You’ll also place your instance into your VPC and assign a Security Group. Think of a Security Group as a virtual firewall for your instance, controlling all incoming and outgoing traffic. This is a non-negotiable security step.
A classic—and dangerous—rookie mistake is opening ports like SSH (port 22) to the entire internet (
0.0.0.0/0). You should always restrict access to a specific IP address or a trusted range, like your office network, to block unauthorized access attempts.
The last step before launch is creating a Key Pair. This is your secure key to the server, consisting of a public key that AWS keeps and a private key file (.pem extension) that you download. It is absolutely critical that you download this private key file and store it somewhere safe. If you lose this file, you're locked out. There is no way to get it back from AWS.
Connecting to Your New Virtual Machine and Running First Commands
Your virtual machine is officially up and running in the AWS cloud, but right now, it's just a silent server waiting for instructions. Think of it like a brand-new car—the engine's on, but you need to get in and actually drive it. This is where you'll use that private key file you downloaded to securely access the command line and take the wheel.
If you're on a Mac or a Linux machine, connecting is pretty straightforward using the built-in Terminal and the ssh (Secure Shell) command. First, open your terminal, navigate to where you saved the .pem file, and run chmod 400 your-key-name.pem. This command changes the file's permissions so that only you can read it. If you skip this, you’re guaranteed to hit a frustrating "permission denied" error. Once permissions are fixed, you can connect with: ssh -i "your-key-name.pem" username@your-instance-ip. The username is usually ec2-user for Amazon Linux and ubuntu for Ubuntu.
For Windows users, the classic method involves a free tool called PuTTY. PuTTY doesn't work with .pem files, so you must first convert it to PuTTY's .ppk format using its companion tool, PuTTYgen. The conversion is quick: open PuTTYgen, load your .pem file, and click "Save private key." With your .ppk file ready, open the main PuTTY application, paste your VM's public IP address into the "Host Name" field, navigate to Connection > SSH > Auth, browse to your .ppk file, and then click "Open" to start the connection.
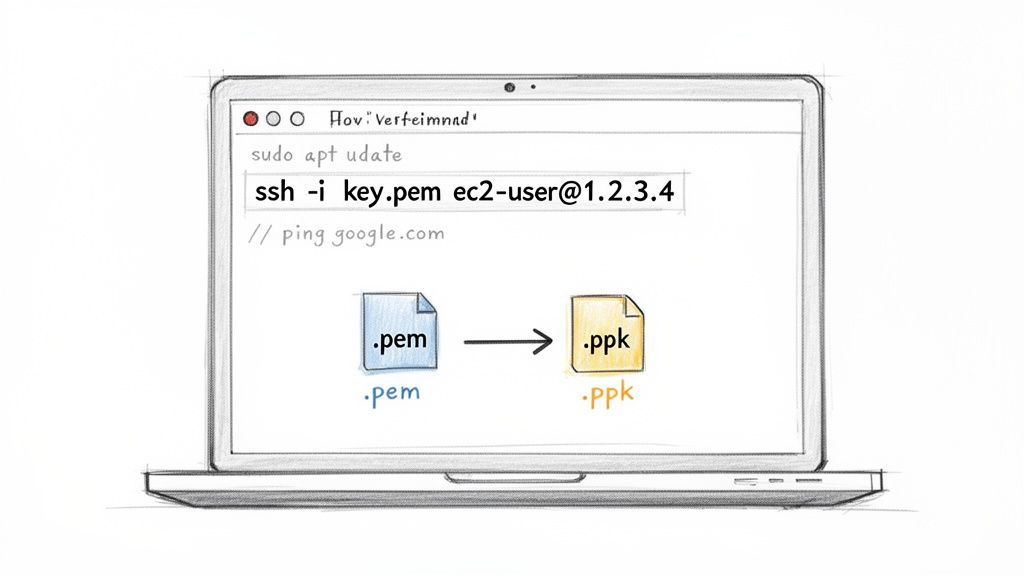
You’re in! A blinking cursor on a black screen means you've successfully connected. Before you jump into installing software, run a couple of quick checks. Start by updating the system's package manager. On an Ubuntu system, the command is sudo apt update. This syncs the list of available software from official repositories. Next, confirm your VM has a solid connection to the internet with ping google.com. If you see replies, your networking and security group rules are working. For more guidance, check out our guide on how to install software in Linux.
How to Manage VM Costs and Avoid Surprise Bills
Spinning up a virtual machine on AWS is refreshingly simple, but keeping the costs from spiraling out of control takes thought. The meter starts running the second you click "launch" and doesn't stop until you manually terminate or stop the VM. This is the classic trap where the cloud's pay-as-you-go model quietly turns into a major financial headache.
First, you have to understand how AWS charges you. For EC2 instances, there are three main pricing models. On-Demand is flexible but the most expensive. Reserved Instances offer significant discounts for a 1 or 3-year commitment. Spot Instances provide the deepest discounts but can be terminated by AWS with little notice. For most non-production environments like development and staging, On-Demand is the go-to because it's so flexible. The problem is, without a solid strategy to manage these instances, those costs add up fast.
| Pricing Model | Best For | Cost Savings Potential | Commitment |
|---|---|---|---|
| On-Demand | Spiky, unpredictable workloads or short-term development and testing. | None (baseline price) | None (pay per hour/second) |
| Reserved Instances | Steady-state, predictable workloads with a known, consistent usage pattern. | Up to 72% vs. On-Demand | 1 or 3-year term |
| Spot Instances | Fault-tolerant, stateless applications like batch processing or data analysis. | Up to 90% vs. On-Demand | None (can be terminated by AWS) |
The single biggest source of wasted cloud spend is paying for servers that are just sitting there doing nothing. A typical development team works from 9 AM to 5 PM, Monday to Friday. That’s 40 hours a week. But there are 168 hours in a full week. This means your non-production VMs are sitting idle for over 120 hours every single week, inflating your AWS bill month after month. Another common cost trap is overprovisioning. It's tempting to choose a bigger VM than you really need "just in case," but that safety buffer comes at a steep price. The key is to practice right-sizing: start with a smaller instance and monitor its performance with a tool like AWS CloudWatch.
Manually stopping and starting dozens of VMs every single day isn't going to happen. This is where automation becomes your most powerful tool. Instead of relying on manual checklists, a visual scheduling tool lets you define automatic start and stop times. This one strategy—parking your instances when they aren't needed—can slash your non-production cloud bill by up to 70%. Tools like Server Scheduler are built specifically for this purpose, giving you a simple point-and-click interface to manage schedules without writing a single line of code. For more hands-on strategies, explore our guide on practical EC2 cost optimization.
Common Questions About Creating a Virtual Machine
Even with a detailed guide, spinning up a virtual machine for the first time can throw a few curveballs your way. Let's tackle some of the most common questions and "what if" scenarios that pop up, so you can troubleshoot quickly and get a better feel for how these pieces fit together.
The difference between a VM and a container comes up all the time. A virtual machine virtualizes the hardware, letting you run a full guest operating system. This offers incredible isolation but has the overhead of a second OS. A container, on the other hand, virtualizes the operating system itself. Containers are much more lightweight because they share the host OS kernel. Think of Docker—it packages just your application and its dependencies. Use a VM when you need total OS-level isolation; go with a container to package and run an application in a lightweight, portable way.
Many people also ask if they can change a VM's size after creating it. Yes, absolutely! This is a huge advantage of the cloud. In AWS, you simply stop your EC2 instance, change its instance type to one with more (or less) CPU and memory, and then start it back up. This flexibility is a lifesaver for managing costs and performance, allowing you to avoid overprovisioning.
Finally, you'll inevitably need to transfer files to your virtual machine. For Linux VMs, the standard is SCP (Secure Copy Protocol), which uses your existing SSH connection. Using the same terminal and private key, you can run a command like scp -i your-key.pem /path/to/local/file.txt ubuntu@your-instance-ip:/home/ubuntu/ to copy a file from your computer to your VM. On Windows, a tool like WinSCP provides a graphical drag-and-drop interface for the same secure protocol.
Related Articles
- EC2 Cost Optimization a Practical Guide for 2024
- How to Install Software in Linux a Step by Step Guide
- How to Start and Stop EC2 Instances on a Schedule
Stop wasting money on idle cloud resources. With Server Scheduler, you can easily automate start/stop schedules for your non-production EC2 and RDS instances, cutting your AWS bill by up to 70% without writing a single script. Get started for free at serverscheduler.com and see how much you can save.