Start Stop EC2 Instances to Slash Your AWS Bill

That ever-growing AWS bill often has a simple culprit: EC2 instances running when nobody is using them. This guide gets straight to the point, showing you how to actively manage your non-production instances—like those for development, staging, and testing—to see real, tangible savings. The strategy is simple: stop paying for compute hours you don't need.
Save time and reduce your AWS bill by up to 70% with our point-and-click scheduler. Explore Server Scheduler's features and see how it simplifies EC2 management.
Contents
Ready to Slash Your AWS Costs?
Stop paying for idle resources. Server Scheduler automatically turns off your non-production servers when you're not using them.
 more than 120 hours every single week. The pay-as-you-go model is a double-edged sword; it offers incredible flexibility but is ruthless when it comes to inefficiency. Understanding the broader benefits of cloud computing for business really hammers home why this kind of efficiency matters.
Instance scheduling is your first line of defense against this kind of cloud waste. It's the simple practice of automatically starting and stopping instances based on a schedule you define. The logic is hard to argue with: if a development server is only used Monday through Friday from 9 AM to 6 PM, it has no business running at 3 AM on a Saturday. Putting automated start/stop schedules in place delivers immediate savings. Teams can cut their on-demand runtime for development fleets by roughly 60–70% just by running them during business hours. That translates directly into a massive drop in their monthly bill. For a deeper look at this whole topic, check out our guide on AWS cost optimization best practices.
Key Takeaway: The single most effective way to start cutting costs is to identify and schedule your non-essential instances. It's a simple change that tackles the largest chunk of cloud waste for most companies with surprisingly little effort.
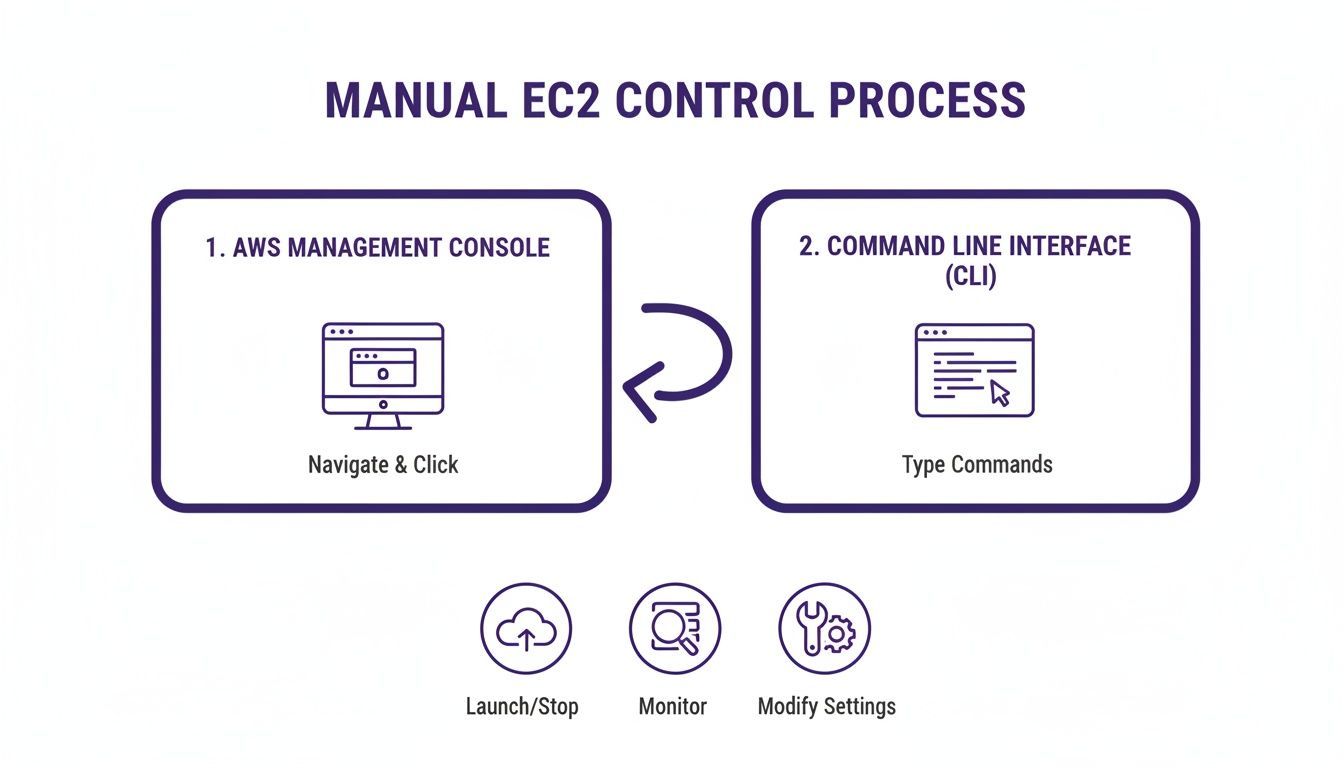
Manual Control Methods for EC2 Instances
Sometimes, you just need to get in there and do it yourself. When you need to fire up a single dev server for a quick test or shut down a staging environment right after a deployment, manual control is the most direct route. For these kinds of one-off tasks, getting comfortable with both the AWS Management Console and the Command Line Interface (CLI) is a fundamental skill for anyone managing EC2 instances. The AWS Management Console is the visual, point-and-click way to manage your resources. It's the perfect starting point if you're not a fan of the terminal or just need to get a quick visual overview of your instance fleet. The process is intuitive: navigate to the EC2 service dashboard, select your instance, click the "Instance state" button, and choose "Start instance," "Stop instance," or even "Reboot instance." If you're a bit fuzzy on the difference between a stop/start and a reboot, our guide on how to reboot an EC2 instance breaks it down clearly.
For those who live in the terminal, the AWS CLI is a much faster and more powerful tool. It's built for speed and scripting, allowing you to bake start/stop commands directly into your existing workflows. To get anything done, you'll need the unique Instance ID for your server, which will look something like i-0123456789abcdef0. The two fundamental commands you'll use to start stop EC2 instances are aws ec2 stop-instances --instance-ids i-0... and aws ec2 start-instances --instance-ids i-0.... You can manage a whole bunch of instances at once by listing out all the Instance IDs you want to target.
Choosing your method boils down to the task at hand. The Console is great for visual confirmation, while the CLI is your best friend for speed and scripting.
| Feature | AWS Management Console | AWS CLI |
|---|---|---|
| Best For | Visual confirmation, beginners | Scripting, automation, speed |
| Learning Curve | Low | Moderate |
| Speed | Slower (multiple clicks) | Faster (single command) |
| Primary Use Case | Quick, infrequent one-off tasks | Repetitive tasks, bulk operations |
Building Your Own Automated EC2 Scheduler
Clicking buttons in the AWS Console is fine for one-off tasks, but if you're relying on manual start/stop actions every day, you're guaranteed to let costs creep back in. To really get a handle on your spending, you need a hands-off, serverless solution. Building your own scheduler with native AWS tools like Amazon EventBridge and AWS Lambda is a powerful and surprisingly cost-effective way to automate how you start stop EC2 instances. This automated approach is a world away from direct manual control, which always involves a sequence of clicks or commands.
The first piece of our automation puzzle is Amazon EventBridge. It's a serverless event bus that basically acts as a sophisticated alarm clock. You can set up rules that fire on a fixed schedule using standard cron expressions. For example, a rule with cron(0 9 * * MON-FRI *) starts instances at 9 AM on weekdays, while another with cron(0 18 * * MON-FRI *) shuts them down at 6 PM. These rules invoke an AWS Lambda function, which contains the logic to find specific EC2 instances and change their state. The most scalable way to target instances is by using tags. Hardcoding instance IDs into your function is brittle; a better strategy is to scan for a specific tag, like environment: dev. This approach is incredibly flexible and requires no code changes as your infrastructure grows. If you want to take automation even further, knowing how to run PowerShell scripts is a huge asset. Check out our comprehensive guide on the topic.
Security should never be an afterthought. Your Lambda function needs permission to talk to your EC2 instances, which is managed with an AWS Identity and Access Management (IAM) role. By following the principle of least privilege, you create an IAM policy that only grants the specific permissions needed: ec2:StartInstances, ec2:StopInstances, and ec2:DescribeInstances. This ensures that even if the function were somehow compromised, the potential damage is strictly limited.
Exploring Advanced and Managed Scheduling Tools
While a DIY Lambda and EventBridge setup is a fantastic starting point, it has its limits. As your AWS environment grows, managing custom scripts can become a full-time job. This is where you should look at more powerful, dedicated scheduling tools that move beyond simple cron jobs to offer robust features for managing how you start stop EC2 instances at scale.
One popular option is the AWS Instance Scheduler on AWS. This is an official AWS Solution you deploy with a CloudFormation template. It uses a combination of AWS Lambda, Amazon EventBridge, and Amazon DynamoDB to manage and apply complex schedules. Instead of burying logic in code, you define schedules in a DynamoDB table, making them easier to manage. This solution is great for handling tricky requirements, like schedules with multiple on/off periods across different time zones.
The AWS Instance Scheduler is powerful, but it’s still self-managed. For many teams, the operational overhead is what they want to avoid. This is where third-party managed tools like Server Scheduler come in. Opting for a managed service shifts the responsibility of maintenance, updates, and support to the provider, freeing up your engineering team. These platforms are built with user experience in mind, offering intuitive interfaces, detailed reporting, cross-account management, and dedicated support. Our own guide on the AWS EC2 Instance Scheduler offers a deep dive into what makes these tools so effective.
Implementing a Rock-Solid Instance Scheduling Strategy
Automating how you start and stop EC2 instances is a massive win for your AWS bill, but a clear strategy is essential to avoid headaches. A rock-solid plan builds a reliable and safe system that works with your team, not against them. The goal is simple: save money without causing surprise downtime or derailing critical workflows. It all starts with a consistent, mandatory tagging policy. Think of tags like environment: dev or auto-schedule: true as the language your automation speaks. Without them, your scheduler is flying blind.
Security is next. Your automation's IAM role should only have the exact permissions it needs: ec2:DescribeInstances, ec2:StartInstances, and ec2:StopInstances. This principle of least privilege minimizes the blast radius in a worst-case scenario. You also need to know if your scheduler is working. Set up monitoring with Amazon CloudWatch Alarms that trigger if your scheduler function fails, sending notifications via Amazon SNS to a team Slack channel. This proactive monitoring turns automation from a liability into a reliable asset.
Finally, the most important rule is knowing what not to automate. Production workloads, stateful services like databases, and CI/CD tools should never be stopped automatically. Use a specific tag, like auto-schedule: false, to explicitly mark these untouchable instances. Your automation logic must respect this exclusion tag without fail. Protecting these critical systems builds trust. While scheduling is key, some instances might also be oversized. You can learn more about how to resize an EC2 instance in our detailed guide.
Common Questions About Managing EC2 Instances
Once you start thinking about automating EC2 schedules, a few key questions almost always come up. When you stop an EC2 instance, any data stored on its attached Amazon Elastic Block Store (EBS) volumes is completely safe. However, data on instance store volumes (ephemeral storage) is wiped forever. Always ensure your critical data is on an EBS volume before scheduling shutdowns. You stop paying for the instance's compute hours when it's stopped, but you are still billed for the storage costs of any attached EBS volumes. To get costs down to zero, you must terminate the instance, which is a permanent deletion.
Scheduling based on CPU usage is called auto-scaling, which is designed to handle unpredictable traffic spikes by launching or terminating instances. Scheduled stopping is for predictable patterns, like non-production environments that are idle overnight. Getting the difference between stopping and terminating is fundamental.
| Action | Description | When to Use |
|---|---|---|
| Stopping | A temporary pause. The instance can be restarted, and its root EBS volume stays intact. | Perfect for daily shutdowns of dev, staging, or QA environments that you'll need again soon. |
| Terminating | A permanent deletion. The instance and its root EBS volume are gone for good. | Use this only when you're completely done with an instance and will never need it again. |
Think of it this way: stopping an instance is like shutting down your laptop. Terminating it is like throwing that laptop in the recycling bin.
Take the complexity out of cloud cost management. With Server Scheduler, you can set up powerful start/stop schedules in minutes, not hours. Start your free trial today and see the savings for yourself.