How to Build a Proxy Server: A DevOps Guide

Before you can build a proxy server, you have to answer a simple question: what do you want it to do? Are you trying to control your team's outbound web access, manage incoming traffic to your applications, or just route specific app data? Your answer will point you toward a forward proxy, a reverse proxy, or a specialized SOCKS proxy.
Ready to simplify your cloud operations and cut costs? Server Scheduler can automate your AWS proxy instances, shutting them down during off-hours to reduce your bill by up to 70%. Start your free trial today!
Contents
Ready to Slash Your AWS Costs?
Stop paying for idle resources. Server Scheduler automatically turns off your non-production servers when you're not using them.
Understanding Your Proxy Server Options
Before you start messing with configurations and code, it’s critical to match your goals with the right type of proxy. Each one serves a distinct purpose, and picking the wrong one is a recipe for performance bottlenecks, security holes, and a whole lot of unnecessary complexity. The three main players you'll run into are forward, reverse, and SOCKS proxies. A forward proxy is basically a gateway for a group of clients—think of an entire office network. It sends all outbound requests to the internet on their behalf, acting as a single point of exit. This setup is perfect for enforcing security policies, caching common websites to speed things up, and filtering web access. For example, a company might use a forward proxy to block social media during work hours or keep employees away from sketchy websites.
On the flip side, a reverse proxy sits in front of your web servers, intercepting requests from the internet. It’s the gatekeeper for your applications. Its main jobs are to distribute traffic (load balancing), handle SSL/TLS encryption, and add a layer of security. A classic real-world example is using a reverse proxy to spread incoming user requests across multiple backend servers, so no single server gets overloaded. This boosts reliability and makes it much easier to scale. Finally, we have SOCKS proxies. These operate at a lower level (Layer 5 of the OSI model) than your typical HTTP proxies. This means they don't care about the protocol and can handle just about any type of traffic, including TCP and UDP. You’ll often see SOCKS proxies used for specific applications that need to route non-web traffic, like email clients, peer-to-peer sharing, or online gaming. They're the versatile choice when you need to tunnel traffic from a specific piece of software, not just a web browser.
A simple way to remember the difference: A forward proxy protects clients by hiding their identities from servers, while a reverse proxy protects servers by hiding their identities from clients.
Let's make this more concrete by looking at how these proxies fit into everyday DevOps work. Knowing these scenarios will help you build a proxy that actually solves your problem.
| DevOps Scenario | Recommended Proxy Type | Why It's a Good Fit |
|---|---|---|
| Secure Internal Tools | Forward Proxy | Restricts outbound connections from staging environments to only approved APIs and services, preventing data leaks. |
| Load Balance a Web App | Reverse Proxy | Distributes incoming user traffic across a fleet of EC2 instances, ensuring high availability and performance. |
| Geo-Specific Testing | Forward/Residential Proxy | Allows QA teams to route traffic through servers in different countries to test localized content and features. |
| Route Database Traffic | SOCKS Proxy | Enables secure and direct routing of traffic from an application server to a database without exposing the database to the public internet. |
Picking the right tool for the job is always the first step. By defining your goal clearly—whether it's managing outbound traffic, handling inbound requests, or routing specific application data—you're setting yourself up for a secure, high-performing, and cost-effective solution. This knowledge is also crucial when you start exploring advanced cloud infrastructure automation tools to manage these resources efficiently.
Setting Up a Forward Proxy with Squid on AWS
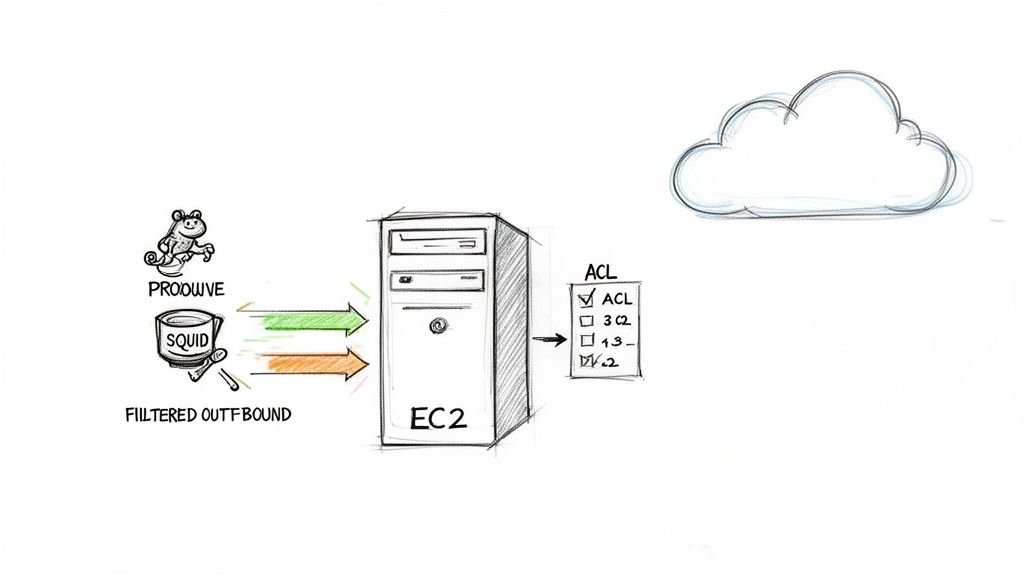
When you need to get a handle on outbound internet traffic for a group of users—maybe to filter content, cache common requests, or just secure the network perimeter—a forward proxy is exactly what you're looking for. Squid is a battle-tested, open-source workhorse that's perfect for the job. Let's walk through how to build a proxy server from scratch using Squid on an Amazon Web Services (AWS) EC2 instance. First, you need a server like a t3.micro or t3.small instance running a stable Linux distro like Ubuntu. While launching the instance, pay close attention to the Security Group. You must open the port Squid will use—the default is port 3128. For the initial setup, lock this port down so it only accepts traffic from your personal IP address.
With your EC2 instance running, SSH into it and install Squid, which is usually a single command. If you need a refresher, we have a guide on how to install software in Linux. The configuration happens in /etc/squid/squid.conf, the brain of your proxy. Always make a backup of this file before you start tinkering. Out of the box, Squid is very restrictive, so you need to define Access Control Lists (ACLs) and http_access rules to allow or deny traffic. You can create rules based on criteria like the user's IP address (src), the destination website (dstdomain), or the time of day (time). The order of these rules is critical, as Squid processes them from top to bottom. A secure pattern is to deny specific traffic first, then allow what you want.
An open proxy is a major security risk. It's much smarter to require users to log in. Squid supports several authentication methods, but a simple username and password setup is a great way to start. You can use a utility like htpasswd to create a password file and then point Squid to it in the squid.conf file. This simple step ensures that only authorized people can use your proxy. With the global Proxy Server Service Market projected to hit USD 2.04 billion by 2035, it's clear that secure, private internet access is a rapidly growing need. A well-configured private proxy puts you in control.
Building a Reverse Proxy with Nginx for High Availability
While a forward proxy handles your outgoing traffic, a reverse proxy is the gatekeeper for all incoming requests to your web applications. It's a critical piece for building any modern, scalable web application, handling everything from load balancing to security. We're going to walk through building a high-availability setup with Nginx on AWS. At its heart, a reverse proxy serves as a single entry point for clients trying to reach your backend services. Instead of connecting directly to your application servers, users hit the Nginx proxy first, which then intelligently routes their requests. This provides high availability and load balancing, preventing any single server from getting overwhelmed. It also adds security by hiding the identity and internal network structure of your backend servers.
To start, spin up an AWS EC2 instance like a t3.micro or t3.small running Ubuntu Server. The most critical part is configuring the Security Group to allow inbound traffic on port 80 (HTTP) and port 443 (HTTPS). Once the instance is up, connect via SSH and install Nginx. You can check that it's working by pasting your instance's public IP into a browser; you should see the default "Welcome to nginx!" page. The real work happens in Nginx's configuration files, typically in /etc/nginx/sites-available/. To set up load balancing, you’ll define an upstream block, which is a list of your backend application servers. You then reference this upstream group inside a server block using the proxy_pass directive. By default, Nginx uses a simple round-robin algorithm to distribute traffic evenly.
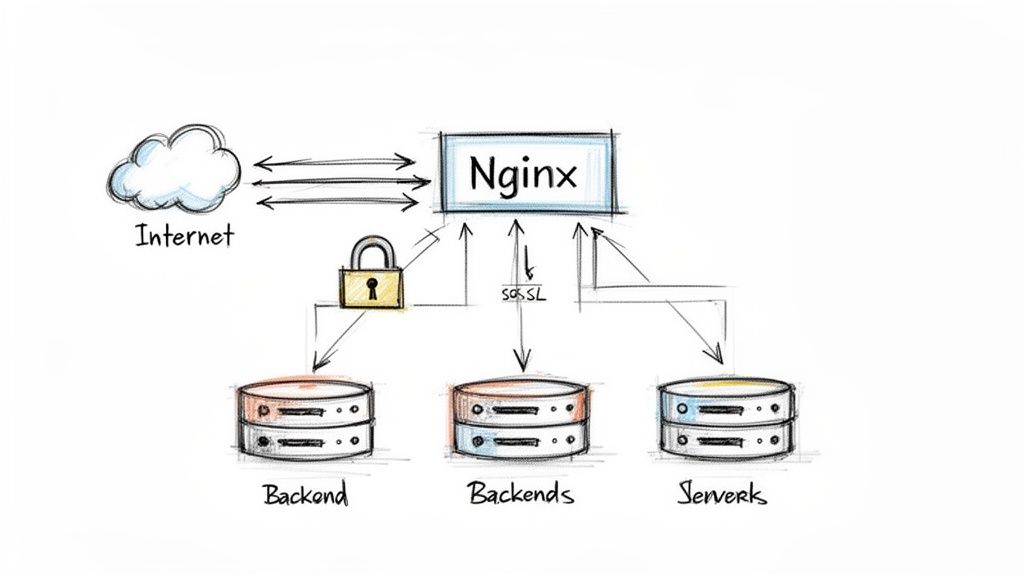
These days, encrypting traffic with HTTPS is non-negotiable. A reverse proxy is the perfect place to manage this through SSL/TLS termination. The proxy deals with the secure, encrypted connection from the client, then talks to the backend servers over a faster, unencrypted internal network. You'll need an SSL certificate, which you can get for free using tools like Let's Encrypt. Once you have your certificate files, you just need to update your Nginx server block to listen on port 443 and point it to your certificate and private key. It's also a good idea to set up a redirect that automatically pushes all HTTP traffic to HTTPS, ensuring every user connection is secure by default. For more context on managing traffic costs, our guide to AWS load balancer pricing is a great resource.
Deploying Specialized Proxies for Advanced Use Cases
While standard HTTP proxies handle web traffic, some jobs require a more specialized tool like SOCKS or residential proxies. These advanced solutions solve unique problems that forward and reverse proxies cannot. A SOCKS5 proxy works at a lower level of the network stack, making it protocol-agnostic. It can handle almost any type of TCP/IP traffic, giving you incredible flexibility for routing data from specific applications—not just web browsers. A classic use case is routing traffic from a database client through a controlled gateway without exposing the service directly to the internet. Dante is a popular and robust open-source SOCKS server for this purpose.
When your task requires you to appear as a legitimate user from a specific geographic location, datacenter IPs often get blocked. This is where residential proxies shine. These proxies route your traffic through real, ISP-assigned IP addresses tied to actual homes, making your requests indistinguishable from an average internet user. This is crucial for tasks like SEO monitoring, ad verification, and price tracking from different regions. The core value of a residential proxy is its legitimacy, allowing you to bypass detection systems that block cloud provider IPs. Building your own residential network is a major undertaking, often requiring an IP rotator to automatically cycle through different IPs to prevent blacklisting. The demand for these services is exploding; the Residential Proxy Server Market is projected to hit USD 148.33 million by 2030.
Optimizing Your AWS Proxy for Security and Cost
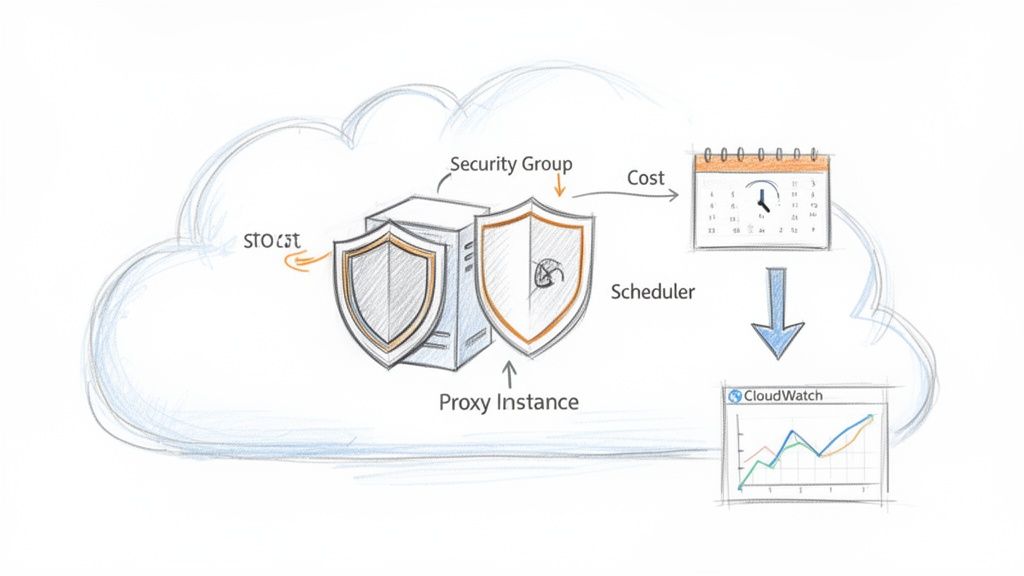
Getting a proxy server running is just the first step; a truly effective proxy is secure, efficient, and cost-effective. Your first line of defense is the network layer, where AWS Security Groups act as virtual firewalls. A common mistake is leaving ports open to the entire internet (0.0.0.0/0). Instead, lock down your security group to only accept traffic on your proxy's specific port from trusted IP addresses, like your office's static IP. Beyond firewalls, strong authentication is a must. An open proxy is an invitation for abuse that can get your server's IP blacklisted. Implementing a simple username and password system is a solid start.
Key Takeaway: A secure proxy operates on the principle of least privilege. It only talks to known sources on required ports and demands authentication from every user. Anything less is a gamble you don't want to take.
You can't protect what you can't see, which is why robust monitoring and logging are essential. Amazon CloudWatch is your best friend here. Most proxy software generates detailed access logs; by installing the CloudWatch Agent on your EC2 instance, you can stream these logs into CloudWatch. From there, you can set up metric filters and alarms for critical events like excessive failed authentication attempts, high error rates, or anomalous traffic volume. This turns your logs into a proactive defense mechanism, alerting your team to threats as they happen.
Finally, cloud costs are a constant pressure. If your proxy is for a non-production environment, letting it run 24/7 is a waste of money. Automating the start and stop times for these instances means you only pay for compute when you need it. Tools like Server Scheduler make this simple, allowing you to create schedules to stop your dev proxy during nights and weekends. This simple tweak can slash its EC2 costs by nearly 70%. It’s a foundational tactic for effective EC2 cost optimization.
Answering Your Top Proxy Server Questions
Once you move past the basic setup, practical questions always emerge. Answering these is key to building a reliable, fast, and secure proxy. Choosing the right AWS EC2 instance is a balancing act between cost and performance. For a small forward proxy or low-traffic reverse proxy, a t3.small or t3.medium is often sufficient. For high-traffic applications, you might need compute-optimized (C-series) or memory-optimized (R-series) instances. The best strategy is to start conservatively, monitor your usage with CloudWatch, and resize based on data.
Performance differs significantly between proxy types. A reverse proxy like Nginx is incredibly fast for web traffic. Forward proxies like Squid can introduce more latency, especially with heavy content filtering. SOCKS5 proxies are generally very fast for non-HTTP traffic since they pass raw packets. For any business-critical job, a dedicated server is almost always the right choice. It guarantees predictable performance and gives you complete control over security, configuration, and logging, preventing your IP from being blacklisted due to another user's actions. Shared proxies are cheaper but come with significant risks to performance and reputation.
When connections fail, troubleshooting methodically is key. The most common culprit is your AWS Security Group configuration; ensure the proxy's port is open to your client's IP address. If the firewall rules are correct, verify that the proxy service (squid or nginx) is running on the server and check its log files for specific error messages. Finally, double-check your client-side settings for simple typos in the IP address, port, or password.
Ready to slash your proxy server's operational costs without sacrificing performance? With Server Scheduler, you can automatically stop non-production instances during off-hours and cut your AWS bill by up to 70%. Start your free trial today and put your cloud savings on autopilot.